Tista COVID-19 Tracker
The repository contains all source code for the Tista COVID-19 Tracker Web Application.
Data sources
The list of the data sources what we are using for the application contains:
Other resources
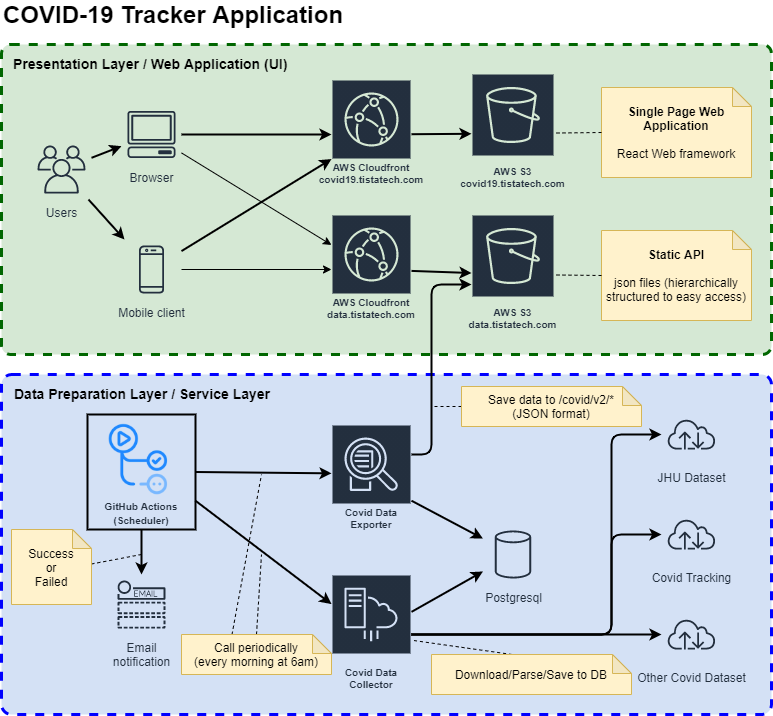
Environment
- Postgresql - stores all collected Covid-19 data (closed for public).
- AWS S3 Buckets - hosting a Covid-19 Tracker Web Application and all generated files with data.
Postgresql Database
Data collector service is using Postgresql database to store all information.
Data exporter service is using Postresql database to transform, analyze, and export Covid-19 data.
AWS S3 Buckets
data.tistatech.com
Data layer for Covid-19 Tracker application.
- https://data.tistatech.com/common/v1/ - all public data (countries, states, counties, population, and etc. information)
- https://data.tistatech.com/covid/v1/ - Covid-19 related data
covid19.tistatech.com
Web application hosting.
- covid19.tistatech.com -> s3://innovation.tistatech.com
Covid-19 Tracker Application Web servers
All Web server for Covid-19 Tracker Web Application are hosted on AWS S3 buckets.
- https://covid19.tistatech.com - Main public server.
Quick Start
The steps how to setup Tista COVID-19 Tracker Web Application:
- Get source code from the Github: https://github.com/TISTATechnologies/cv19.
- Create Postgresql database.
- Create AWS S3 bucket for data and setup static site hosting on it (ex: cv19data)
- Create AWS S3 bucket for Web Application and setup static site hosting on it (ex: cv19web).
- Create configuration file ~/cv19.dev.conf, use a .env.sample file as an example
- Initialize a new database for cv19 project:
CV19_ENV=dev ./data/covid-database/migrate-db.sh init - Collect the data:
CV19_ENV=dev ./scripts/start-pull-data-services.sh - To see historical and trends data we need to collect more data on each days:
cd <project dir> for i in $(seq 90 -1 1); do dt=$(date +"%Y-%m-%d" -d "-${i} days") yes | ./scripts/start-pull-data-services.sh ${dt} || exit 1 done - Export collected data to the json files:
CV19_ENV=dev ./scripts/start-export-data-services.sh - Upload all json files into the AWS S3 bucket with data:
CV19_ENV=dev ./upload-covid-data-to-s3-bucket.sh - Now you should have latest Covid-19 data on your AWS S3 bucket: http://cv19data.s3-website.us-east-1.amazonaws.com/covid/v1/daily/latest/us/dc/11001.json
- Build a web application and deploy it to the S3 bucket:
export CV19_ENV=dev cd webapp npm install npm run build npm run deploy - Now you can open the Tista COVID-19 Tracker site: http://cv19web.s3-website.us-east-1.amazonaws.com
Development
We are using company github TISTATechnologies to store source code.
Get source code:
git clone git@github.com:TISTATechnologies/cv19.git
Requirements
- Nodejs 12+
- Postgresql Client 10+
- Python 3.8+
- awscli
Architecture
Code structure
data- data and service layercovid-database- sql script to initialize, update, and work with databaseservices- services, scripts to collect, transform and export data
scripts- devops and helper scripts for the projecttests- tests for the projectdata- tests to validate data: database and exported static datae2e- end-2-end tests for WebApp and for the exported datajmeter- jmeter tests for loadtesting
webapp- source code of a Web Application based on React
Configuration
Before build and deploy the application, you need to specify configuration
using system environment variables or specify it inside a .env file at the root project’s level.
Please look into the .env.sample for details.
From other side you can create ~/cv19.xxx.conf configuration file inside your home directory
and specify this configuration file with a system environment variable CV19_ENV=xxx.
Note: .env file has more priority than ~/cv19.xxx.conf file.
Release
- Freeze all future changes (new functionality or fixes) should be inside the develop branch.
- The develop branch should be at the top of the master branch
git checkout master git pull git checkout develop git rebase master git push origin develop - Merge all changes from the develop branch into the master branch. Don’t make a loops with auto merge.
git co master git merge develop - Create new tag with the new version
git tag <new version> # example: git tag 1.5.0 git push origin <new version> # example: git push origin 1.5.0 - Push master branch to the remote
git push origin master - Now you are ready to deploy a new release version to the Production.
NOTE: You must tag the new version release source code in the master branch before the build because the WebApp build script is using git tag to generate the _version.json file.
Build/deploy Web Application manually
See Configuration section before manual deploy.
cd <project directory>/webapp
npm install && \
npm run build && \
yes | npm run deploy
This script will install all required packages for WebApp, build React application and deploy it to the S3 bucket.
You can specify a configuration file ~/cv19.dev.conf and call this script:
export CV19_ENV=dev
cd <project directory>/webapp
npm install && \
npm run build && \
yes | npm run deploy
Create database
./data/covid-database/migrate-db.sh init
CI/CD
Github Actions are using to Build/Deploy/Test and to Collect/Test data.
Collect data
- Collect all latest data:
./scripts/start-pull-data-services.sh - Collect data on the specific date:
./scripts/start-pull-data-services.sh 2020-04-23
Export data
- Export all latest data from database:
./scripts/start-export-data-services.sh - Export data on the specific date from database:
./scripts/start-export-data-services.sh 2020-04-23
All exported data will be stored inside the ./build/covid/ directory.
Use a command ./scripts/upload-covid-data-to-s3-bucket.sh to deploy all data files from ./build/covid to the S3 Bucket.
NOTE: Don’t forget to remove all data inside the ./build/ directory which you are not planning to upload into the S3 Bucket.
Testing
Notes
Useful/Helper scripts
Collect all data for 90 days
cd <project dir>
for i in $(seq 90 -1 1); do
    dt=$(date +"%Y-%m-%d" -d "-${i} days")
    echo ""
    echo ""
    echo ""
    echo ""
    echo "==================================================================================="
    echo "|  PROCESSING   ${dt}                                                 |"
    echo "==================================================================================="
    yes | ./scripts/start-pull-data-services.sh ${dt} || exit 1
done
Export all data for 90 days
for i in $(seq 90 -1 1); do
    dt=$(date +"%Y-%m-%d" -d "-${i} days")
    yes | ./scripts/start-export-data-services.sh ${dt} || exit 1
done
Collect latest data and upload it to the S3 Bucket
This script can be executed by scheduler every day at 6:00 am to collect and export all new data.
rm  -rf ./build
yes | ./scripts/start-pull-data-services.sh \
&& yes | ./scripts/start-export-data-services.sh \
&& yes | ./scripts/upload-covid-data-to-s3-bucket.sh
Test collected and exported data
This script can be executed after the previous script to validate collected data.
cd tests/e2e
npm install
npm run generate
npm run test:database
npm run test:api
Links
Data sources: Covid-19
- https://github.com/CSSEGISandData/COVID-19/tree/master/csse_covid_19_data/csse_covid_19_daily_reports
- http://covidtracking.com/api
- https://usafacts.org/visualizations/coronavirus-covid-19-spread-map/
- https://github.com/nytimes/covid-19-data
- https://covid-19.datasettes.com/ -> https://github.com/simonw/covid-19-datasette
- https://coronavirus.jhu.edu/us-map
- https://coronavirus.maryland.gov/
License
The source code inside this repository are licensed under the Apache 2.0 License and the data content is licensed under the Creative Commons Attribution-ShareAlike 4.0 License.